Weapon Scripting II
We already learned how to script weapons without projectiles in Weapon Scripting I. This guide will show you how to add projectiles.
 Before we start with scripting projectiles we have to learn something about the Carnage Contest coordinate and angle system.
A position/point is specified with an X- and an Y-coordinate. This works nearly like the cartesian coordinate system. Most people should know it from school.
Before we start with scripting projectiles we have to learn something about the Carnage Contest coordinate and angle system.
A position/point is specified with an X- and an Y-coordinate. This works nearly like the cartesian coordinate system. Most people should know it from school.
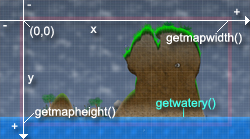
The difference to Carnage Contest: The Y values are mirrored and the point (0|0) is not in the center but at the top left corner of the map.
The unit used in Carnage Contest is pixels. It's the same unit you have when creating/drawing an image with Microsoft Paint (or similiar programs)!
Have a look at the image! It also shows some useful commands:
- getmapwidth() returns the width of the map
- getmapheight() returns the height of the map
- getwatery() returns the Y-coordinate where the water starts
 Another important thing is rotation and angles. Many projectiles are moved with sinus and cosinus stuff and a certain angle.
The angles in Carnage Contest differ from the angles commonly used. 0� is not at the right (3 o'clock) but at the top (12 o'clock).
Another important thing is rotation and angles. Many projectiles are moved with sinus and cosinus stuff and a certain angle.
The angles in Carnage Contest differ from the angles commonly used. 0� is not at the right (3 o'clock) but at the top (12 o'clock).
Calculation of movement with a certain angle and distance is done this way:
This is actually a very important calculation which is used in nearly every weapon script with projectiles.
(math.rad has to be used to convert from degrees to radians. Degrees are used for angles in Carnage Contest. However the Lua functions math.sin/math.rad need the angle in radians. That's why they have to be converted first.)
Open the file and scroll to line 95:
What's that? It's the command which is used to add a projectile to the game. Nearly like the addweapon command!
It returns the ID which is saved in the so called 'projectile table' ('cc.laser.ray'). It's like the weapon table and it has to contain a function called 'draw' and a function called 'update'. We will learn more about these functions later.
Scroll to line 56:
This line creates a new instance of our laser ray projectile we defined before with addprojectile.
The amount of projectile instances (existing at the same time) is theoretically unlimited but you will get a Lua error message that you don't have enough memory when you exaggerate (several hundred projectiles).
Let's have a look at the following lines:
Carnage Contest itself doesn't care about variables for projectiles. It simply knows that
there is an projectile, that it has a certain type and ID and that the draw- and update-functions have to be called until the projectile is deleted. Therefore ALL variables for
projectiles are mentained with Lua only - and that is done with these script lines.
Again you are not forced to handle the projectile data this way. It's all up to you. However this is a very easy method to access and modify data of as many projectiles as you need. Moreover Carnage Contest automatically deletes the contents of 'projectiles' at the beginning of each turn. Very handy, huh?
First there is a 'ignore' variable. This is just a little trick for the collision detection. The later script will ignore collisions with the player saved in this variable (the current player) until the projectile doesn't collide with anything anymore (then the variable will be set to 0). This is done to avoid that the projectile instantly hits and damages the player who shoots. It would be really silly if you would always shoot yourself.
X- and Y-coordinates are assigned afterwards. The commands getplayerx and getplayery are used to let the projectile start at the position of the player. Including a little offset based on getplayerdirection and getplayerrotation.
Afterwards the projectile gets a speed value for X and Y movement. In this case a speed of 15 pixels. This is 750 pixels per second because the game runs with 50 frames per second (15*50=750). Note that sinus and cosinus are used to calculate the speed with a certain angle as we learned it before.
The last variable is a timer. This timer will later be permanently increased and the projectile will be deleted if the timer exceeds a certain value. Most projectiles don't need a timer for deletion because they will drop into the water anyway due to gravity. However the laser rays are not affected by gravity so we have to delete them after a certain time. Otherwise they would fly around for an infinite time and the game would never end (because a turn goes on until all projectiles are deleted).
 All variables are now created. What now? Another (somehow dirty) 'trick' to avoid some problems!
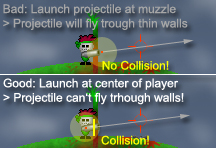
The projectile is launched in front of the muzzle of the gun. However this gun does not have a collision because that would be pretty odd and inconvenient. This leads to the fact that the gun could collide with the terrain while firing it. It could even overlap a thin 'wall' so that the end of the gun barrel is in open space again. That's a problem because when you fire the gun in this situation the projectile will simply fly because it's launched in open space. However the player is actually on the other side of that thin wall. It leads to something like a cheat. You can shoot through thin walls by simply standing close to them and firing your weapon.
To avoid that the projectile is first moved backwards a bit. Now it is not at the end of the gun anymore but it collides with the player who shoots. After doing that the projectile is moved. In this case 3 times (the do-loop). This is enough movement to bring the projectile to its real starting position again. The muzzle of the gun. The movement is performed by calling a function called 'move'. This function also checks the collision. That's it! Problem solved! The projectile will collide and will be destroyed on its way from the center of the player to the muzzle of the gun. Even if there is just a very thin wall: You will not be able to shoot through it if you apply this trick with the right values in your script.
Another thing to mention: The 'move' function returns 1 if the projectile is destroyed. In this case the loop is left with the break command because no more movement is needed.
Take a look at 'cc.laser.ray.draw()' in lines 97-110!
Note that the draw function has an ID parameter. It is the projectile ID. We need this ID to get the values of the projectile from our projectiles array.
First some commands are used to setup the drawing mode. setblend('blend_light') will make the projectile glow, setalpha sets the transparency, setcolor the color and setscale the size. Finally setrotation sets the rotation of the projectile. math.atan2 and math.deg are used to calculate the rotation from the speed variables in degrees. Then drawimage draws the projectile at the position which is saved in the 'projectiles'-array.
There is also another useful command 'outofscreenarrow'. This draws an arrow at the edges of the screen if the given coordinate is not inside the currently visible area. This arrow points at the projectile and makes it easier to find it.
First there is the timer. It's increased each frame and deletes the projectile after a certain time. Always make sure that all projectiles will be deleted - no matter what happens! Otherwise the game will not go on!
Afterwards the rotation is calculated (like it's done in the drawing code) and saved to a local variable. This is followed by some other calculations and assignments. What happens there?
'msub' stands for 'movement sub' and means partial movement. 'msubt' for 'movement sub total' - that's the total number of partial movement steps. Yeah. Partial movement.
The projectile is not moved the full 15 pixels in one step. Instead the movement is splitted in several steps.
The higher absolute (not negative) of the both speed values is divided by 3 and saved in 'msub'. Both speeds are then divided by this value and saved in 'msubx' and 'msuby'.
These values are the speeds for the steps and each step moves the projectile up to 3 pixels and not more. This leads to a perfect collision precision because a 3x3 pixel image is used
for the collision.
The stepwise movement is performed in the do-loop. In each step a collision detection is performed with the collision command. The projectile will be deleted and damage will be caused as soon as the projectile collides. Collisions with the player who shot will be ignored because he is saved in the 'ignore' variable (as above-mentioned). 'ignore' will be set to 0 as soon as no collision occurs. This is not necessary for the laser but for other weapons like the bow. Imagine you shoot an arrow into the sky. It will fall down to you and hit you. Therefore 'ignore' has to been reset. Otherwise the arrow would fly through you again.
Besides the collision there is also a condition which checks if the projectile hits the water. In this case it will be removed as well.
Use the command reference at this website to learn more and study existing scripts to learn how things work.
I hope this guide helped and I wish good luck and much fun while creating your own Carnage Contest weapons!
(Peter S., Developer of Carnage Contest)
Back to Part I
Command Reference
Coordinate System & Angles
Before we start with scripting projectiles we have to learn something about the Carnage Contest coordinate and angle system.
A position/point is specified with an X- and an Y-coordinate. This works nearly like the cartesian coordinate system. Most people should know it from school.The difference to Carnage Contest: The Y values are mirrored and the point (0|0) is not in the center but at the top left corner of the map.
The unit used in Carnage Contest is pixels. It's the same unit you have when creating/drawing an image with Microsoft Paint (or similiar programs)!
Have a look at the image! It also shows some useful commands:
- getmapwidth() returns the width of the map
- getmapheight() returns the height of the map
- getwatery() returns the Y-coordinate where the water starts
Another important thing is rotation and angles. Many projectiles are moved with sinus and cosinus stuff and a certain angle.
The angles in Carnage Contest differ from the angles commonly used. 0� is not at the right (3 o'clock) but at the top (12 o'clock).Calculation of movement with a certain angle and distance is done this way:
x=x+math.sin(math.rad(angle))*distance
y=y-math.cos(math.rad(angle))*distance
(math.rad has to be used to convert from degrees to radians. Degrees are used for angles in Carnage Contest. However the Lua functions math.sin/math.rad need the angle in radians. That's why they have to be converted first.)
Add Projectile
After knowing these basics of the Carnage Contest coordinate system we can start to work on our projectile. Let's have a look at the original 'Laser' weapon script. You can find it at 'scripts/CC Original/weapons/Laser.lua'.Open the file and scroll to line 95:
cc.laser.ray.id=addprojectile("cc.laser.ray")It returns the ID which is saved in the so called 'projectile table' ('cc.laser.ray'). It's like the weapon table and it has to contain a function called 'draw' and a function called 'update'. We will learn more about these functions later.
Creating Projectile
The projectile has been defined but we still need to create it to see it in-game. This is done in the attack function of the weapon. Why? Because the weapon launches the projectiles! Terrific!Scroll to line 56:
id=createprojectile(cc.laser.ray.id)
The amount of projectile instances (existing at the same time) is theoretically unlimited but you will get a Lua error message that you don't have enough memory when you exaggerate (several hundred projectiles).
Let's have a look at the following lines:
projectiles[id]={}
-- Ignore collision with current player at beginning
projectiles[id].ignore=playercurrent()
-- Set initial position of projectile
projectiles[id].x=getplayerx(0)+(7*getplayerdirection(0))-math.sin(math.rad(getplayerrotation...
projectiles[id].y=getplayery(0)+3+math.cos(math.rad(getplayerrotation(0)))*5.0
-- Set speed of projectile
projectiles[id].sx=math.sin(math.rad(getplayerrotation(0)))*15.0
projectiles[id].sy=-math.cos(math.rad(getplayerrotation(0)))*15.0
-- Timer
projectiles[id].timer=0
-- Initial movement
projectiles[id].x=projectiles[id].x-projectiles[id].sx*1.5
projectiles[id].y=projectiles[id].y-projectiles[id].sy*1.5
for i=1,3,1 do
	if cc.laser.ray.move(id)==1 then
		break
	end
end'projectiles' - Array of Projectile Tables
First of all there is 'projectiles[id]={}'. 'projectiles' is an array of tables and this assignment creates a new empty table in this array. The ID of the projectile instance is used as the index for its data in the 'projectiles'-array. So the projectile ID is the key to the variables of the projecile.Again you are not forced to handle the projectile data this way. It's all up to you. However this is a very easy method to access and modify data of as many projectiles as you need. Moreover Carnage Contest automatically deletes the contents of 'projectiles' at the beginning of each turn. Very handy, huh?
Setting Initial Projectile Values
The following lines now actually fill the table with variables for the new projectile.First there is a 'ignore' variable. This is just a little trick for the collision detection. The later script will ignore collisions with the player saved in this variable (the current player) until the projectile doesn't collide with anything anymore (then the variable will be set to 0). This is done to avoid that the projectile instantly hits and damages the player who shoots. It would be really silly if you would always shoot yourself.
X- and Y-coordinates are assigned afterwards. The commands getplayerx and getplayery are used to let the projectile start at the position of the player. Including a little offset based on getplayerdirection and getplayerrotation.
Afterwards the projectile gets a speed value for X and Y movement. In this case a speed of 15 pixels. This is 750 pixels per second because the game runs with 50 frames per second (15*50=750). Note that sinus and cosinus are used to calculate the speed with a certain angle as we learned it before.
The last variable is a timer. This timer will later be permanently increased and the projectile will be deleted if the timer exceeds a certain value. Most projectiles don't need a timer for deletion because they will drop into the water anyway due to gravity. However the laser rays are not affected by gravity so we have to delete them after a certain time. Otherwise they would fly around for an infinite time and the game would never end (because a turn goes on until all projectiles are deleted).
Launch Collision Trick
All variables are now created. What now? Another (somehow dirty) 'trick' to avoid some problems!The projectile is launched in front of the muzzle of the gun. However this gun does not have a collision because that would be pretty odd and inconvenient. This leads to the fact that the gun could collide with the terrain while firing it. It could even overlap a thin 'wall' so that the end of the gun barrel is in open space again. That's a problem because when you fire the gun in this situation the projectile will simply fly because it's launched in open space. However the player is actually on the other side of that thin wall. It leads to something like a cheat. You can shoot through thin walls by simply standing close to them and firing your weapon.
To avoid that the projectile is first moved backwards a bit. Now it is not at the end of the gun anymore but it collides with the player who shoots. After doing that the projectile is moved. In this case 3 times (the do-loop). This is enough movement to bring the projectile to its real starting position again. The muzzle of the gun. The movement is performed by calling a function called 'move'. This function also checks the collision. That's it! Problem solved! The projectile will collide and will be destroyed on its way from the center of the player to the muzzle of the gun. Even if there is just a very thin wall: You will not be able to shoot through it if you apply this trick with the right values in your script.
Another thing to mention: The 'move' function returns 1 if the projectile is destroyed. In this case the loop is left with the break command because no more movement is needed.
Draw Function
Again we also need functions to script the functionality. And again we have just two functions: draw and update. And... yeah - again we only use the draw function to draw the thing. NEVER EVER use the draw function for anything else. Only drawing. No movement, no damage, no terrain manipulation.Take a look at 'cc.laser.ray.draw()' in lines 97-110!
Note that the draw function has an ID parameter. It is the projectile ID. We need this ID to get the values of the projectile from our projectiles array.
First some commands are used to setup the drawing mode. setblend('blend_light') will make the projectile glow, setalpha sets the transparency, setcolor the color and setscale the size. Finally setrotation sets the rotation of the projectile. math.atan2 and math.deg are used to calculate the rotation from the speed variables in degrees. Then drawimage draws the projectile at the position which is saved in the 'projectiles'-array.
There is also another useful command 'outofscreenarrow'. This draws an arrow at the edges of the screen if the given coordinate is not inside the currently visible area. This arrow points at the projectile and makes it easier to find it.
Update Function
In this case the update function does only one thing: Calling the 'move'-function which performs the actual movement with the ID of the current projectile as parameter.First there is the timer. It's increased each frame and deletes the projectile after a certain time. Always make sure that all projectiles will be deleted - no matter what happens! Otherwise the game will not go on!
Afterwards the rotation is calculated (like it's done in the drawing code) and saved to a local variable. This is followed by some other calculations and assignments. What happens there?
msubt=math.ceil(math.max(math.abs(projectiles[id].sx),math.abs(projectiles[id].sy))/3)
msubx=projectiles[id].sx/msubt
msuby=projectiles[id].sy/msubt
The stepwise movement is performed in the do-loop. In each step a collision detection is performed with the collision command. The projectile will be deleted and damage will be caused as soon as the projectile collides. Collisions with the player who shot will be ignored because he is saved in the 'ignore' variable (as above-mentioned). 'ignore' will be set to 0 as soon as no collision occurs. This is not necessary for the laser but for other weapons like the bow. Imagine you shoot an arrow into the sky. It will fall down to you and hit you. Therefore 'ignore' has to been reset. Otherwise the arrow would fly through you again.
Besides the collision there is also a condition which checks if the projectile hits the water. In this case it will be removed as well.
The End
Now you learned how weapons with projectiles work. However this is just a very short and basic guide which only shows the most important principles of weapon scripting for Carnage Contest. Many things have not even been mentioned for example interface commands or particles. There is very much freedom and many ways to realize weapon scripts for Carnage Contest.Use the command reference at this website to learn more and study existing scripts to learn how things work.
I hope this guide helped and I wish good luck and much fun while creating your own Carnage Contest weapons!
(Peter S., Developer of Carnage Contest)
Back to Part I
Command Reference